| Advisor |

|

|

|
|
|
||||||||||||||||
|
||||||||||||||||
|
|
||||||||||||||||
| Identifying Functions | ||||||||||||||||
|
||||||||||||||||
|
|
||||||||||||||||
| Developing Functions | ||||||||||||||||
|
||||||||||||||||
|
|
||||||||||||||||
| Guiding Parents | ||||||||||||||||
|
||||||||||||||||
|
|
||||||||||||||||
|
Teacher Resources
Creating a MindLadder Toolbox PDF
The creation of a MindLadder toolbox is a project you and your students can launch at the onset of the school year and continue to work on throughout the year. Students can even bring their MindLadder toolbox with them from grade to grade. The toolbox project enables students to achieve a better understanding of the functions they learn about through the personal ownership that comes from describing and illustrating the functions in their own words and creative ways.
The MindLadder toolbox is first and foremost a framework that encourages meaningful, deep learning about the knowledge construction functions. It can be used with younger and older students alike as it easily accommodates different levels of maturation, knowledge and interest.
In developing their toolbox, students can use the range of media, but the organization of the toolbox usually centers on a ring-binder. A ring-binder enables students to add, revise and remove materials as they deepen their understanding of what the functions are, when and where to use them, and how they are important. In this way, the toolbox becomes not only an evolving portfolio of the student's work, but also a resource that students may consult in earnest as they work on projects and troubleshoot problems within any of the curricular subject areas.
The toolbox project adds to the continuity and coherence of the work you and your students do with the subject area content in your classroom. Also, since the knowledge construction functions recur across all the individual academic content areas, it is possible for all the teachers in a team of educators to contribute to a single, unified toolbox project. Such a project can become a framework for rich, creative expression; learning; sharing; and fun.
The toolbox project provides a rich set of opportunities for students to express their growing knowledge and insights about the processes they use to work with and develop knowledge. Students often choose to include their MindLadder toolbox when asked to select illustrations of their learning to share when parents and other visitors come to the schools.
The sections below provide some specific ideas and resources you may find useful for a MindLadder toolbox project in your classroom. Modify as you see fit. The sections are organized under the following headings:
Communicating about Knowledge Construction Functions
Many teachers introduce the knowledge construction functions as 'brain tools'. The term provides an easy and accurate way for students to distinguish the processes that are used by the mind from the content knowledge of the academic subject areas. Evoking from memory or planning, for instance, easily become recognized as brain tools that are distinct from the academic disciplines, even as we can benefit from applying these tools within all areas of functioning whether in and out of school. Brain tools are used to collect, connect, and communicate information. Across the different subject areas, they enable us to process information, identify rules, learn from experience and transition from novice to proficient levels of problem solving and functioning.
Knowledge construction functions or brain tools are just two ways of describing the processes people use to assemble knowledge and acquire proficiency. Over time, and depending on the language you use in your classroom, students may start to refer to the brain tools as 'knowledge construction functions' or simply as 'functions' or just 'KCF'. To achieve higher levels of precision and speed, some may start to employ the shorthand that is used in the MindLadder model, e.g. T-8 (i.e. Evoking from Memory) or T-23 (i.e. Planning).
You may think of other useful ways to communicate with your students about the knowledge construction functions. You may wish to brainstorm with them to see what kinds of ideas you come up with as a class. Students and teachers tend to arrive at the language that suits them best given their evolving need for quick and proficient ways to communicate about the functions.
The unique circumstances that surround the learning events within any particular group of students may lead to the formation and use of labels for knowledge construction functions that have a special, shared, and vivid meaning. These tend to be unique and idiosyncratic to each group.
Student 1: Remember Kaboom!
Students: Yah (laughter) - don't forget Kaboom!
New Student: What is Kaboom!
Student 1: We were constructing a bridge using sticks. The bridge had to be able to sustain a certain weight. When we had just finished the bridge, I placed a car on it without weighing it first. The bridge collapsed. Everyone was just stunned and silent. Nobody looked at each other. Then someone said Kaboom! and we all burst out laughing. The car, it turned out, was much heavier than the requirement for the bridge. The bridge might have been OK. Now Kaboom! has come to mean that we better slow down to test a relationship before we go ahead.
New Student: Great, I think I learned a lesson just now. Thanks! (Smiles).
Introducing the Toolbox
Below is some language that illustrates how one elementary school teacher introduced the toolbox project to her students. As you will see, this teacher took advantage of the easy analogy between a toolbox, tools, the brain and brain tools. Adapt or create language that works for you and your students.
Teacher: Have you ever seen a tool box? Do you have a tool box at home? What's a tool box for?
Students: You keep tools in it. It's a place for your tools.
Teacher: Yes, you keep tools in it. What's a tool?
Students: It's something that helps you do things. It's something that helps you do your work.
Teacher: Yes, tools help us do our work more easily, efficiently and successfully. For example: Is it easier to pound a nail in the wall with your hand or a hammer?
Students: A hammer!!
Teacher: Yes, can you give another example?
Student 1: You use a brush to clean the dishes.
Student 2: And a towel to dry them!
Student 3: We use a tooth brush to clean our teeth.
Student 4: And the dentist uses a drill if we don't use the brush (laughter).
Teacher: OK, good examples! What are some other kinds of tools? Let's name as many as we can, and I'll list them on the board.
Students: A saw, a screwdriver, a ruler, a shovel, a calculator, a compass, a clock, a pen, a knife, a spoon etc.
Teacher: OK, so we have many different tools to do different kinds of work. How do you know which tool to use?
Students: It depends on what you have to do.
Teacher: Yes, it depends on what your task is or what the problem is that you are working on or want to solve. If you want to put a nail in the wall to hang a picture, you use a ...?
Students: Hammer!
Teacher: Yes, and if you want to cut some wood you use a ...?
Students: Saw! - Or an ax.
Teacher: Yes. If you used a saw to hammer a nail, would you be very successful?
Students: NO!
Teacher: OK. Did you ever wonder why sometimes in your schoolwork you were not very successful? Why sometimes things seem to be easy for you and sometimes they are difficult?
Students: Yes!
Teacher: What kind of work do we do at school?
Students: Math, Reading, Science, etc.
Teacher: And what do we have to do, to do our math and science?
Students: We have to have our books.
Students: We have to have our paper and our pencils.
Teacher: Yes, the books, the paper and the pencils; they are all tools, but what are they tools for? What do they enable us to do?
Students: To think!
Teacher: Yes, we need to think to do our work at school. And what do we use to think?
Students: Our brain.
Teacher: Yes, our brain. Well, how would you like to have a brain tool box filled with tools that help you do your thinking work, tools that will help you learn more easily and efficiently? Just like the hammer and the saw and other tools help us to be better workers. Our brain is like a tool box. We can fill it up with many different thinking tools that will help us learn better. I call them 'brain tools' or sometimes they are called knowledge construction functions. Brain tools are used to construct knowledge.
Teacher: This year we will be learning about many of these brain tools, so that we can do our work well and become better thinkers and more successful learners. Remember, many of you said you sometimes have difficulty with your work and sometimes you don't? Well, when you have difficulties, the reason could be that you did not use the right brain tool for the task you are working on. It is like using the saw instead of the hammer to pound the nail. Or may be that the right brain tool, or thinking tool, is not yet in your toolbox, and so you need to develop it. This year we are going to spend some of our time learning how to think and how to learn so that math and reading and science and all our subjects will be easier for you to work on. How does that sound to you?
Students: Good!
Teacher: So our brain is like the tool box; it is there we have the tools we need to learn and solve problems. Now, we need a way to help us organize and keep track of the brain tools we learn about. How could we do that?
Students: We can write them on the board.
Teacher: Yes, that is a way to keep track of them, but we cannot keep them there for very long as we need the space on the board for our lessons.
Students: We can write them in a book.
Teacher: Yes, and if we each have our own book, or ring-binder, we can all write down what we think and understand about each brain tool. That is like having a toolbox to help us when we use our minds. We can add to it as we go through the school year. Do you want to do this?
Students: Yah! - Let's make a toolbox for our brain tools.
Organizing and Developing the Toolbox
Teachers have only so much time to work with their students and many curricular goals to accomplish. Taking time to develop knowledge construction functions can save considerable time as students with stronger knowledge construction functions master curricular goals faster and better than students with weaker knowledge construction functions. As you get increasingly familiar with facilitating both content acquisition and process development, you will see that the two do not intrude on each other, but instead go hand in hand. Even so, you need to decide how time is best allocated between content instruction and the development of knowledge construction functions.
In order to make these decisions, it is useful to consider learning events from the standpoint of how open or closed they are to student choice. While you always structure the learning environment and guide student progress, the more you want to focus on the development of knowledge construction functions the more open a learning event ought to be. Conversely, a learning event can be more closed if your aim is to provide instruction about the facts or figures that belong to a given academic subject area. Over time, to accomplish your inclusive learning goals, you have to use a mix that includes relatively closed and open formats alike. Both serve important purposes.
When you work with your students on the organization and development of their MindLadder toolbox, there should generally be ample room for active student participation and choice. Student motivation tends to flow into learning events that are open to active student participation which, in turn, makes students' knowledge construction processes more visible to you and your students alike. (This is true not only for the toolbox project, which specifically focuses on the KCF, but also for any academic content lesson). You need to structure the amount of student participation and choice, so you and your students can make the best use of the available time. Here is an example, drawn from the organization of the toolbox project:
When you think about the design and organization of the toolbox, you are likely to give consideration to the kind of binder and paper that will be used. You can either make these decisions for the class or you can open them up and create a learning experience to identify and strengthen one or more knowledge construction functions (e.g. T-22: Goal Seeking and Goal Setting, T-23: Planning, R-7: Systematic Exploratory Behavior, and R-10: Simultaneously Using Multiple Sources of Information): What kind of paper will you use? What kind of binding will be used? Is a ring binder a good idea? Why. What other supplies will we need to work on our toolboxes? What kinds of suggestions might you share with your students for the name of the toolbox binder? Should the cover be ready-made by you or will you have the students create their own cover? Over time, the role of student choice is central to the development of the toolbox. There needs to be room to explore and try creative, new ways to express oneself.
There are many ways to proceed. Some are listed below. You may choose a few, that always should be included (e.g. #1 - 3), and ask students to select some from the remainder, or come up with new and different ones on their own. While students should have space in their toolbox binder for each of the individual knowledge construction functions, you cover with them in class, they are likely to include also materials that address more comprehensive parts of the knowledge construction process. For example, students may draw their head to illustrate their understanding of the reception, transformation, and communication parts of information processing. They may use such creations as a front cover or as general illustrations for the reception, transformation and communication functions.
Analyze examples carefully. Guide students to sharpen and improve accuracy where needed. Students can learn much about the knowledge construction functions from the ideas and examples others come up with and from the discussions these examples stimulate. The goal is for students to acquire the knowledge construction functions and spontaneously apply them wherever they can serve the student in the academic and broader areas of their lives.
Connecting the Toolbox with the MindLadder LearningGuide
The MindLadder LearningGuide application enables you to create a Composite LearningGuide that maps your students' process learning needs as a whole class. You can use the Composite LearningGuide to identify knowledge construction functions that are relatively strong and those that need further development for the students in your class as a whole. Take a look at the individual LearningGuides for students, you are especially concerned about.
You do not have to develop all the KCF over the course of an academic year. Use the Composite - supplemented by information from individual LearningGuides as needed - to identify the knowledge construction functions you want to focus on. Make sure this group includes some that already may be relatively strong. It is easier for you and your students to develop a strong toolbox project, if you start out with functions that already are relatively efficient in your group. This allows everyone to get comfortable with the concept of brain tools and to use the parameters of the toolbox to rediscover something they already know in an exciting, new and different light.
Think about your curriculum for the upcoming unit, quarter or even the entire academic year, if you will. Take a look at the curriculum from the standpoint of its pre-requisite knowledge construction functions. You can take advantage of the resources of the LearningGuide Advisor to do this (e.g. click Identifying Functions: Academic Standards). As you think through your curriculum, begin to create possible sequences of the order in which you might develop your students' knowledge construction functions. For any given lesson, you will most often have just one or two central knowledge construction functions. Others are likely to get mentioned and reinforced as you and your students concentrate on the ones you have selected.
As a general rule, you may wish to start with one of the later T-functions, such as T-22: Goal Seeking and Goal Setting or T-23: Planning. Placing the emphasis on one of the later T-functions creates a context of relevance within which other KCF then easily assume significance (e.g. T-3: Preliminary Problems Analysis - Use of Cues, R-6: Verbal Tools or Concepts, or R-7: Systematic Exploratory Behavior). There is more than one way to proceed and each has its own advantages. Pick the one you are most excited about.
Some teachers and students decide to place the familiar shape of the MindLadder intellective knowledge construction functions in a large poster format on a wall in the classroom (see Figure 1). Sometimes, the creation of this poster is done by the students as
Figure 1: Generic shape of the MindLadder knowledge construction functions.

a MindLadder toolbox activity. In the course of this activity, teachers and students can discuss how we use different brain tools to receive, transform and communicate information and teachers may introduce the labeling system for the functions, i.e. R for reception, T for transformation and C for communication.
Some elementary school teachers prefer a generic poster that has room for each of the KCF, but otherwise has no labels or information. Others prefer a poster that shows the MindLadder function codes as illustrated in Figure 1. Middle and high school teachers may prefer to create a colored poster of the Composite LearningGuide for the specific group of students, they are teaching. The poster can be used as a basis for discussions with the students about the process learning objectives the class will focus on in connection with the pursuit of its academic content objectives. Such a discussion can, once again, be integrated within a toolbox project.
Using the Toolbox as an Evolving Resource
Unlike content-related projects that come to an end, a toolbox project can be extended across both subject-area classes and grade-levels as students cover additional functions and refine their understanding of their nature and significance in different academic disciplines.
The rapid growth of content knowledge in many areas of society places great pressures on curriculum developers. What to put in and what to take out? When more is put in than taken out - a common occurrence - pressure is placed on teachers and students to accomplish more in the same amount of time.
Teachers can teach less and students can learn more when time is taken to develop students' knowledge construction functions. The functions are used across all the academic content areas and, unlike the content of the curriculum, the functions do not obsolete over time. Instead, they enable students to become better learners and learners who are prepared for life in the rapidly changing knowledge economy.
The creation of a MindLadder toolbox is a project you and your students can launch at the onset of the school year and continue to work on throughout the year. Students can even bring their MindLadder toolbox with them from grade to grade. The toolbox project enables students to achieve a better understanding of the functions they learn about through the personal ownership that comes from describing and illustrating the functions in their own words and creative ways.
The MindLadder toolbox is first and foremost a framework that encourages meaningful, deep learning about the knowledge construction functions. It can be used with younger and older students alike as it easily accommodates different levels of maturation, knowledge and interest.
In developing their toolbox, students can use the range of media, but the organization of the toolbox usually centers on a ring-binder. A ring-binder enables students to add, revise and remove materials as they deepen their understanding of what the functions are, when and where to use them, and how they are important. In this way, the toolbox becomes not only an evolving portfolio of the student's work, but also a resource that students may consult in earnest as they work on projects and troubleshoot problems within any of the curricular subject areas.
The toolbox project adds to the continuity and coherence of the work you and your students do with the subject area content in your classroom. Also, since the knowledge construction functions recur across all the individual academic content areas, it is possible for all the teachers in a team of educators to contribute to a single, unified toolbox project. Such a project can become a framework for rich, creative expression; learning; sharing; and fun.
The toolbox project provides a rich set of opportunities for students to express their growing knowledge and insights about the processes they use to work with and develop knowledge. Students often choose to include their MindLadder toolbox when asked to select illustrations of their learning to share when parents and other visitors come to the schools.
The sections below provide some specific ideas and resources you may find useful for a MindLadder toolbox project in your classroom. Modify as you see fit. The sections are organized under the following headings:
- Communicating about Knowledge Construction Functions
- Introducing the Toolbox
- Organizing and Developing the Toolbox
- Connecting the Toolbox with the MindLadder LearningGuide
- Using the Toolbox as an Evolving Resource
Many teachers introduce the knowledge construction functions as 'brain tools'. The term provides an easy and accurate way for students to distinguish the processes that are used by the mind from the content knowledge of the academic subject areas. Evoking from memory or planning, for instance, easily become recognized as brain tools that are distinct from the academic disciplines, even as we can benefit from applying these tools within all areas of functioning whether in and out of school. Brain tools are used to collect, connect, and communicate information. Across the different subject areas, they enable us to process information, identify rules, learn from experience and transition from novice to proficient levels of problem solving and functioning.
Knowledge construction functions or brain tools are just two ways of describing the processes people use to assemble knowledge and acquire proficiency. Over time, and depending on the language you use in your classroom, students may start to refer to the brain tools as 'knowledge construction functions' or simply as 'functions' or just 'KCF'. To achieve higher levels of precision and speed, some may start to employ the shorthand that is used in the MindLadder model, e.g. T-8 (i.e. Evoking from Memory) or T-23 (i.e. Planning).
You may think of other useful ways to communicate with your students about the knowledge construction functions. You may wish to brainstorm with them to see what kinds of ideas you come up with as a class. Students and teachers tend to arrive at the language that suits them best given their evolving need for quick and proficient ways to communicate about the functions.
The unique circumstances that surround the learning events within any particular group of students may lead to the formation and use of labels for knowledge construction functions that have a special, shared, and vivid meaning. These tend to be unique and idiosyncratic to each group.
Student 1: Remember Kaboom!
Students: Yah (laughter) - don't forget Kaboom!
New Student: What is Kaboom!
Student 1: We were constructing a bridge using sticks. The bridge had to be able to sustain a certain weight. When we had just finished the bridge, I placed a car on it without weighing it first. The bridge collapsed. Everyone was just stunned and silent. Nobody looked at each other. Then someone said Kaboom! and we all burst out laughing. The car, it turned out, was much heavier than the requirement for the bridge. The bridge might have been OK. Now Kaboom! has come to mean that we better slow down to test a relationship before we go ahead.
New Student: Great, I think I learned a lesson just now. Thanks! (Smiles).
Below is some language that illustrates how one elementary school teacher introduced the toolbox project to her students. As you will see, this teacher took advantage of the easy analogy between a toolbox, tools, the brain and brain tools. Adapt or create language that works for you and your students.
Teacher: Have you ever seen a tool box? Do you have a tool box at home? What's a tool box for?
Students: You keep tools in it. It's a place for your tools.
Teacher: Yes, you keep tools in it. What's a tool?
Students: It's something that helps you do things. It's something that helps you do your work.
Teacher: Yes, tools help us do our work more easily, efficiently and successfully. For example: Is it easier to pound a nail in the wall with your hand or a hammer?
Students: A hammer!!
Teacher: Yes, can you give another example?
Student 1: You use a brush to clean the dishes.
Student 2: And a towel to dry them!
Student 3: We use a tooth brush to clean our teeth.
Student 4: And the dentist uses a drill if we don't use the brush (laughter).
Teacher: OK, good examples! What are some other kinds of tools? Let's name as many as we can, and I'll list them on the board.
Students: A saw, a screwdriver, a ruler, a shovel, a calculator, a compass, a clock, a pen, a knife, a spoon etc.
Teacher: OK, so we have many different tools to do different kinds of work. How do you know which tool to use?
Students: It depends on what you have to do.
Teacher: Yes, it depends on what your task is or what the problem is that you are working on or want to solve. If you want to put a nail in the wall to hang a picture, you use a ...?
Students: Hammer!
Teacher: Yes, and if you want to cut some wood you use a ...?
Students: Saw! - Or an ax.
Teacher: Yes. If you used a saw to hammer a nail, would you be very successful?
Students: NO!
Teacher: OK. Did you ever wonder why sometimes in your schoolwork you were not very successful? Why sometimes things seem to be easy for you and sometimes they are difficult?
Students: Yes!
Teacher: What kind of work do we do at school?
Students: Math, Reading, Science, etc.
Teacher: And what do we have to do, to do our math and science?
Students: We have to have our books.
Students: We have to have our paper and our pencils.
Teacher: Yes, the books, the paper and the pencils; they are all tools, but what are they tools for? What do they enable us to do?
Students: To think!
Teacher: Yes, we need to think to do our work at school. And what do we use to think?
Students: Our brain.
Teacher: Yes, our brain. Well, how would you like to have a brain tool box filled with tools that help you do your thinking work, tools that will help you learn more easily and efficiently? Just like the hammer and the saw and other tools help us to be better workers. Our brain is like a tool box. We can fill it up with many different thinking tools that will help us learn better. I call them 'brain tools' or sometimes they are called knowledge construction functions. Brain tools are used to construct knowledge.
Teacher: This year we will be learning about many of these brain tools, so that we can do our work well and become better thinkers and more successful learners. Remember, many of you said you sometimes have difficulty with your work and sometimes you don't? Well, when you have difficulties, the reason could be that you did not use the right brain tool for the task you are working on. It is like using the saw instead of the hammer to pound the nail. Or may be that the right brain tool, or thinking tool, is not yet in your toolbox, and so you need to develop it. This year we are going to spend some of our time learning how to think and how to learn so that math and reading and science and all our subjects will be easier for you to work on. How does that sound to you?
Students: Good!
Teacher: So our brain is like the tool box; it is there we have the tools we need to learn and solve problems. Now, we need a way to help us organize and keep track of the brain tools we learn about. How could we do that?
Students: We can write them on the board.
Teacher: Yes, that is a way to keep track of them, but we cannot keep them there for very long as we need the space on the board for our lessons.
Students: We can write them in a book.
Teacher: Yes, and if we each have our own book, or ring-binder, we can all write down what we think and understand about each brain tool. That is like having a toolbox to help us when we use our minds. We can add to it as we go through the school year. Do you want to do this?
Students: Yah! - Let's make a toolbox for our brain tools.
Teachers have only so much time to work with their students and many curricular goals to accomplish. Taking time to develop knowledge construction functions can save considerable time as students with stronger knowledge construction functions master curricular goals faster and better than students with weaker knowledge construction functions. As you get increasingly familiar with facilitating both content acquisition and process development, you will see that the two do not intrude on each other, but instead go hand in hand. Even so, you need to decide how time is best allocated between content instruction and the development of knowledge construction functions.
In order to make these decisions, it is useful to consider learning events from the standpoint of how open or closed they are to student choice. While you always structure the learning environment and guide student progress, the more you want to focus on the development of knowledge construction functions the more open a learning event ought to be. Conversely, a learning event can be more closed if your aim is to provide instruction about the facts or figures that belong to a given academic subject area. Over time, to accomplish your inclusive learning goals, you have to use a mix that includes relatively closed and open formats alike. Both serve important purposes.
When you work with your students on the organization and development of their MindLadder toolbox, there should generally be ample room for active student participation and choice. Student motivation tends to flow into learning events that are open to active student participation which, in turn, makes students' knowledge construction processes more visible to you and your students alike. (This is true not only for the toolbox project, which specifically focuses on the KCF, but also for any academic content lesson). You need to structure the amount of student participation and choice, so you and your students can make the best use of the available time. Here is an example, drawn from the organization of the toolbox project:
When you think about the design and organization of the toolbox, you are likely to give consideration to the kind of binder and paper that will be used. You can either make these decisions for the class or you can open them up and create a learning experience to identify and strengthen one or more knowledge construction functions (e.g. T-22: Goal Seeking and Goal Setting, T-23: Planning, R-7: Systematic Exploratory Behavior, and R-10: Simultaneously Using Multiple Sources of Information): What kind of paper will you use? What kind of binding will be used? Is a ring binder a good idea? Why. What other supplies will we need to work on our toolboxes? What kinds of suggestions might you share with your students for the name of the toolbox binder? Should the cover be ready-made by you or will you have the students create their own cover? Over time, the role of student choice is central to the development of the toolbox. There needs to be room to explore and try creative, new ways to express oneself.
There are many ways to proceed. Some are listed below. You may choose a few, that always should be included (e.g. #1 - 3), and ask students to select some from the remainder, or come up with new and different ones on their own. While students should have space in their toolbox binder for each of the individual knowledge construction functions, you cover with them in class, they are likely to include also materials that address more comprehensive parts of the knowledge construction process. For example, students may draw their head to illustrate their understanding of the reception, transformation, and communication parts of information processing. They may use such creations as a front cover or as general illustrations for the reception, transformation and communication functions.
-
Explain in your own words what this brain tool enables you do when you try to figure things out.
-
Describe a situation in class where this brain tool is useful for you. If you want, you can think about more than one subject area.
-
Describe a situation at home where this brain tool can be useful.
-
Make a drawing that shows how this brain tool works.
-
Can you think about some situations where this brain tool might be important for people with different kinds of jobs?
-
Make up a story where this brain tool plays an important role. Explain.
-
Can you think of an example of what might happen if someone forgot to use this brain tool?
-
Write a short play or skit that includes this brain tool.
-
Make a joke about this brain tool.
-
Make a drawing or cartoon that shows how this brain tool is used.
-
Make a drawing or cartoon that shows what can happen when this brain tool is used incorrectly.
-
Can you think of how people might use this brain tool in different parts of the world?
-
Can you think of how people might have used this brain tool at different times in history?
-
How might a scientist use this brain tool?
-
How might an artist use this brain tool?
-
How important do you think this knowledge construction function is? Explain.
Analyze examples carefully. Guide students to sharpen and improve accuracy where needed. Students can learn much about the knowledge construction functions from the ideas and examples others come up with and from the discussions these examples stimulate. The goal is for students to acquire the knowledge construction functions and spontaneously apply them wherever they can serve the student in the academic and broader areas of their lives.
The MindLadder LearningGuide application enables you to create a Composite LearningGuide that maps your students' process learning needs as a whole class. You can use the Composite LearningGuide to identify knowledge construction functions that are relatively strong and those that need further development for the students in your class as a whole. Take a look at the individual LearningGuides for students, you are especially concerned about.
You do not have to develop all the KCF over the course of an academic year. Use the Composite - supplemented by information from individual LearningGuides as needed - to identify the knowledge construction functions you want to focus on. Make sure this group includes some that already may be relatively strong. It is easier for you and your students to develop a strong toolbox project, if you start out with functions that already are relatively efficient in your group. This allows everyone to get comfortable with the concept of brain tools and to use the parameters of the toolbox to rediscover something they already know in an exciting, new and different light.
Think about your curriculum for the upcoming unit, quarter or even the entire academic year, if you will. Take a look at the curriculum from the standpoint of its pre-requisite knowledge construction functions. You can take advantage of the resources of the LearningGuide Advisor to do this (e.g. click Identifying Functions: Academic Standards). As you think through your curriculum, begin to create possible sequences of the order in which you might develop your students' knowledge construction functions. For any given lesson, you will most often have just one or two central knowledge construction functions. Others are likely to get mentioned and reinforced as you and your students concentrate on the ones you have selected.
As a general rule, you may wish to start with one of the later T-functions, such as T-22: Goal Seeking and Goal Setting or T-23: Planning. Placing the emphasis on one of the later T-functions creates a context of relevance within which other KCF then easily assume significance (e.g. T-3: Preliminary Problems Analysis - Use of Cues, R-6: Verbal Tools or Concepts, or R-7: Systematic Exploratory Behavior). There is more than one way to proceed and each has its own advantages. Pick the one you are most excited about.
Some teachers and students decide to place the familiar shape of the MindLadder intellective knowledge construction functions in a large poster format on a wall in the classroom (see Figure 1). Sometimes, the creation of this poster is done by the students as
Figure 1: Generic shape of the MindLadder knowledge construction functions.
a MindLadder toolbox activity. In the course of this activity, teachers and students can discuss how we use different brain tools to receive, transform and communicate information and teachers may introduce the labeling system for the functions, i.e. R for reception, T for transformation and C for communication.
Some elementary school teachers prefer a generic poster that has room for each of the KCF, but otherwise has no labels or information. Others prefer a poster that shows the MindLadder function codes as illustrated in Figure 1. Middle and high school teachers may prefer to create a colored poster of the Composite LearningGuide for the specific group of students, they are teaching. The poster can be used as a basis for discussions with the students about the process learning objectives the class will focus on in connection with the pursuit of its academic content objectives. Such a discussion can, once again, be integrated within a toolbox project.
Unlike content-related projects that come to an end, a toolbox project can be extended across both subject-area classes and grade-levels as students cover additional functions and refine their understanding of their nature and significance in different academic disciplines.
The rapid growth of content knowledge in many areas of society places great pressures on curriculum developers. What to put in and what to take out? When more is put in than taken out - a common occurrence - pressure is placed on teachers and students to accomplish more in the same amount of time.
Teachers can teach less and students can learn more when time is taken to develop students' knowledge construction functions. The functions are used across all the academic content areas and, unlike the content of the curriculum, the functions do not obsolete over time. Instead, they enable students to become better learners and learners who are prepared for life in the rapidly changing knowledge economy.
Backmapping Academic Content Using a Third Grade Math Problem PDF
When teachers discover that students are having difficulty with academic content, they can go a number of ways. For example, they can re-teach the content. If that doesn't work, they can re-teach it in a simpler way or provide exercises that rise along a slower gradient of difficulty.
Another option teachers can pursue is to develop the knowledge construction functions that are needed to process the academic content, they teach. This option will pay off when students in the classroom are unfamiliar with these prerequisite functions or unaware of how to bring them into play. Such students are stomped by the task and re-teaching the content will not address their problem. On the other hand, if a fragile or missing knowledge construction function can be found and developed, it is likely to assist the learner not only with the problem at hand, but also with other problems and tasks that call for this function.
The task used in this exercise is a third grade math problem. It has been adapted from an item in a U.S. National Assessment of Educational Progress (NAEP) that was selected by the news media as an example of a relatively simple task that, nonetheless, caused problems for large numbers of students, even beyond third grade. For our purposes, the objective is to identify knowledge construction functions that can explain the occurrence of such difficulties in the selected math problem. Formulated differently, the exercise is to 'backmap' academic content in order to highlight the processes of knowledge construction that are used to master it. The task appears in Figure 1.
The exercise consists of three parts. After you do the exercise by yourself, or with a colleague, you may wish to use it as an activity with your students. All you need to do is to make an overhead of the math problem, project it on a screen, and guide your students based on the information in each of the three parts of the exercise as described below.
Figure 1: Third Grade Math Problem
 Part I
Study the information given in the math problem in Figure 1. Try to discover at least five knowledge construction functions whose absence can prevent students from arriving at the correct answer. The LearningGuide Advisor includes a list of all the MindLadder knowledge construction functions (click Identifying Functions: Lists and Codes). List your functions and explain the significance of each for solving the math problem.
Part II
Take a look at the knowledge construction functions below. When in need of development, each can impede a learner's ability to solve the math problem in Figure 1. See if some of the functions you identified are on the list. The list is not exhaustive. May be you identified a function that is not on the list. Use the list to think critically about the role each knowledge construction function plays.
Part III
Now extend the exercise into different academic subject areas. For example, select two knowledge construction functions from the list above. For each one, think about a curricular objective from the language arts, social studies and science curriculum where this process of knowledge construction will make a difference. If you do this exercise with your students, facilitate their discovery of specific instances where the use of each knowledge construction function is important but use the examples from the different academic disciplines to facilitate their discovery also of the broad applicability of these functions, or brain tools, across the different academic subject areas.
When teachers discover that students are having difficulty with academic content, they can go a number of ways. For example, they can re-teach the content. If that doesn't work, they can re-teach it in a simpler way or provide exercises that rise along a slower gradient of difficulty.
Another option teachers can pursue is to develop the knowledge construction functions that are needed to process the academic content, they teach. This option will pay off when students in the classroom are unfamiliar with these prerequisite functions or unaware of how to bring them into play. Such students are stomped by the task and re-teaching the content will not address their problem. On the other hand, if a fragile or missing knowledge construction function can be found and developed, it is likely to assist the learner not only with the problem at hand, but also with other problems and tasks that call for this function.
The task used in this exercise is a third grade math problem. It has been adapted from an item in a U.S. National Assessment of Educational Progress (NAEP) that was selected by the news media as an example of a relatively simple task that, nonetheless, caused problems for large numbers of students, even beyond third grade. For our purposes, the objective is to identify knowledge construction functions that can explain the occurrence of such difficulties in the selected math problem. Formulated differently, the exercise is to 'backmap' academic content in order to highlight the processes of knowledge construction that are used to master it. The task appears in Figure 1.
The exercise consists of three parts. After you do the exercise by yourself, or with a colleague, you may wish to use it as an activity with your students. All you need to do is to make an overhead of the math problem, project it on a screen, and guide your students based on the information in each of the three parts of the exercise as described below.
Figure 1: Third Grade Math Problem
Part I
Study the information given in the math problem in Figure 1. Try to discover at least five knowledge construction functions whose absence can prevent students from arriving at the correct answer. The LearningGuide Advisor includes a list of all the MindLadder knowledge construction functions (click Identifying Functions: Lists and Codes). List your functions and explain the significance of each for solving the math problem.
Part II
Take a look at the knowledge construction functions below. When in need of development, each can impede a learner's ability to solve the math problem in Figure 1. See if some of the functions you identified are on the list. The list is not exhaustive. May be you identified a function that is not on the list. Use the list to think critically about the role each knowledge construction function plays.
-
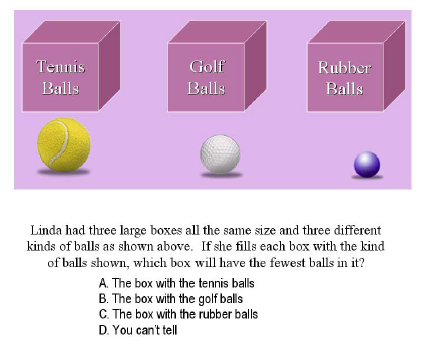
R-6: Verbal Tools and Concepts - this knowledge construction function is needed to decode the information that is used to present the math problem. For example, a learner who does not have access to the concepts of 'same', 'different', 'size' and 'fewest' is reduced to random guessing.
-
T-3: Selection of Relevant Cues - this knowledge construction function is used to survey the text and the accompanying illustration for cues to identify important vs. irrelevant information. In this problem, the only difference that matters about the balls is their size, or volume. Differences in their texture and color are not important.
-
R-7: Systematic Exploratory Behavior - this knowledge construction function is needed to approach the collection of information in a methodical and organized way. If the learner erratically shifts the visual focus then the incoming data-stream may include a snippet of a ball, then a snippet of language, then a snippet of a box, then a snippet of an answer option. The information that is registered is fragmented, piecemeal and disorganized. This precludes the application of the higher-level cognitive processes that are needed to identify stable relationships.
-
R-10: Simultaneous Use of Multiple Sources of Information - this knowledge construction function is needed to operate on different sources of information at the same time. In this case, the sources include the size of the boxes (a constant) and the size of the balls (a variable). Learners who do not have access to this knowledge construction function may be able to consider the characteristics of the balls or the characteristics of the boxes - but not both at the same time.
-
T-6: Interiorization - this knowledge construction function is needed to turn the given information into components for thought that can be manipulated mentally. Since physical manipulation and trial and error are precluded in this printed problem, the only way forward is via the mind. This means that the relevant components of the problem have to be taken from the context of their appearance and made available for mental activity. The function of interiorization converts the physical or visual reality into a cognitive or mental reality. Once accomplished, it would not matter whether the student closed her eyes: The information would be on board.
-
T-10: Ordering and Grouping - this knowledge construction function is needed to sequence objects such as, in this case, the three different balls. The relationship needed to identify the correct answer cannot be precisely specified without sequencing the three balls along the relevant parameter of size - i.e. from small to medium to large.
-
T-11: Hypothetical Thinking - this knowledge construction function is needed to put the variables and entities of the problem into play in mental experiments. "What would happen if I were to place these different kinds of balls into their boxes?" This knowledge construction function allows the learner to imagine contingencies that can be used both to identify and verify solutions.
-
T-14: Need to Search for and Establish Relationships - this knowledge construction function regulates the supply of effort needed to seek relationships. In this problem, it is necessary to search for and establish the relationship between the constant size of the boxes and the variable size of the balls.
-
T-25: Search for Cause-Effect Relationships - this knowledge construction function is needed to search for and establish stable rules. In the math problem the rule is that dividing a constant container volume (the same size of the boxes) by increasing object volume (the different sizes of the balls) yields progressively smaller numbers. Since the volume of tennis balls is larger than the other balls, fewer tennis balls can fit into boxes of the same size.
Part III
Now extend the exercise into different academic subject areas. For example, select two knowledge construction functions from the list above. For each one, think about a curricular objective from the language arts, social studies and science curriculum where this process of knowledge construction will make a difference. If you do this exercise with your students, facilitate their discovery of specific instances where the use of each knowledge construction function is important but use the examples from the different academic disciplines to facilitate their discovery also of the broad applicability of these functions, or brain tools, across the different academic subject areas.
Using Content-Free Materials to Mediate KCF PDF
Exercises I and II
Background: Subject Areas and Content-Free Materials
Teachers use learning events from their individual academic subjects to mediate the development of the knowledge construction functions students need to process information and solve problems in that area. Through their instruction, teachers must connect the functions with the verbal tools, concepts, syntax, grammar, and facts that make up their discipline, and they must orchestrate opportunities for students to fuse its process and content dimensions through experience with real and meaningful problems within the discipline. This combination enables teachers to attend both to the content dimension of subject area knowledge and to the process dimension of the knowledge construction functions. The combination enables learners to go through the transition from the shallow and tentative performance of the novice to the proficient and confident performance of the skilled and knowledgeable student.
The need to develop and connect knowledge construction functions within each academic discipline is aided by the fact that the same knowledge construction functions recur across the disciplines. We use systematic exploratory behavior (R-7) in biology, chemistry, social studies, language arts and math and we search for relationships (T-14) and establish rules (T-25) across all of them.
The re-occurrence of the knowledge construction functions across all the subject areas means that all educators can accomplish some parts of the development of knowledge construction functions using generic materials that, relative to the academic disciplines, can be described as 'de-contextualized' or 'content-free'. With mediation, such materials can be used to launch (or boost) the development of students' knowledge construction functions and prepare them for integration and use within each content area as described above.
The purpose of this exercise is to show how you can use so-called content-free materials to accomplish this goal. The MindLadder dynamic assessment program provides a number of such tools that educators can use to develop knowledge construction functions for students with both regular and special learning needs. With one exception, all of the tools were developed at the International Center for Cognition and Learning specifically for dynamic assessment purposes. The exception is the Complex Figure which was developed in 1945 by Rey and Osterrieth for unrelated purposes. The Rey-Osterrieth Complex Figure, nonetheless, provides an excellent task to learn about and develop knowledge construction functions, and it is, as noted, available in the MindLadder dynamic assessment kit. The Complex Figure is reproduced in Figure 1. You can print and make overheads of the stimulus card as needed for the exercises described in this resource.
Classroom teachers can learn to use the MindLadder dynamic assessment tools initially with individual children and, subsequently, with small groups or even whole classrooms of students. The special design of these materials enables teachers and students to develop knowledge construction functions to ready them for integration and use within the academic subject areas. Once there, as indicated above, the functions need to be connected with the content dimension through instruction and teacher-mediated opportunities to apply them within real and meaningful situations.
There are two advantages to the use of content-free materials that should be mentioned here. First, the removal of the normal, academic content dimension enables materials to be designed that provide trained educators with tools to more precisely investigate the knowledge construction functions and mediate their development. Second, the removal of familiar content can produce a motivational advantage, especially for students who are struggling in the academic content areas. For these students, poor motivation often accompanies familiar academic tasks that have become associated with failure. The benefit of unfamiliar, decontextualized tasks is that educators often more easily can mediate the development of the knowledge construction functions that may have played a role in producing the failure in the academic areas to begin with. Once the functions have been developed in the decontextualized format, they can be connected and proceduralized within the subject area, where they need to operate to become meaningful.
Two Exercises
The two exercises included in this resource both use the Rey-Osterrieth Complex Figure. The first is designed for you to use your own cognition to learn about the knowledge construction functions. The second is designed for you to use the Complex Figure to work with individual students or, when you have acquired experience, groups of students. In this second exercise you will first observe knowledge construction
Figure 1: Ray-Osterrieth Complex Figure

functions ('pre-mediation'), then facilitate the development of key functions ('mediation'), and then observe the results of such mediation ('post-mediation'). Finally, you and your student(s) will examine the changes from the pre-mediation to the post-mediation phase and discuss the benefits of the mediation that was provided. The two exercises are described below.
Complex Figure - Exercise I
In this exercise you will use your own cognition and information processing to learn about the knowledge construction functions. To do this exercise, you need two pieces of plain white paper, a pencil and an eraser. You may wish to print and place a copy of the stimulus card in front of you. There are two parts to the exercise.
Part I: Copy
Place the Complex Figure in front of you. Orient it horizontally with the diamond to the right. Now copy the figure. To benefit from the exercise, try to observe yourself, your thinking (cognition), and your behavior as you copy the figure. Pay attention also to your affect and motivation. See if you can experience each of the following knowledge construction functions:
Part II: Reproduction from Memory
Place the model of the Complex Figure out of sight along with your copy of the figure. Using the second piece of white blank paper, try to reproduce the figure from memory. See if you can experience a role for each of the following knowledge construction functions:
When you have drawn what you remember, summarize the functions you used in your own words. Now compare your copy and your reproduction from memory with the model figure, and with one another. Look at how you approached the tasks. How did you start in each case? Did you follow the edge of the figure? Did you start with a detail, or did you look for a central organizing element such as the large rectangle? Which way is likely to provide the most support for copying and reproducing the figure? Did you notice any changes in the way you went about the task when you drew the figure from memory compared to when you copied it? What might account for any differences you see? What did you learn, overall, about the knowledge construction functions from copying and reproducing the Complex Figure?
To complete this exercise, think about the students in your school or classroom and how they can benefit from developing the knowledge construction functions, you have learned about here. Try to find examples from the academic subject areas and curricular goals where these knowledge construction functions play a role. Use the resources of the LearningGuide Advisor to learn more about each of these functions and their development. Click Identifying Functions: Academic Standards for examples of how knowledge construction functions connect to academic standards. Click Developing Functions: Classroom Dialogues for information about the kind of interaction you can use to introduce a new knowledge construction function in the classroom. Click Developing Functions: General Strategies for information about how to develop each function.
Now that you have become familiar with the Complex Figure, you can use the second exercise to learn how you can employ it to launch or boost the development of your students' knowledge construction functions.
Complex Figure - Exercise II
In this exercise, you will use the Complex Figure to work interactively or 'dynamically' with a student in order to identify and mediate knowledge construction functions in need of development. If you work individually with a number of students, you will get a sense of the range of your students' process learning needs. You will also develop an understanding of the versatility of the Complex Figure as a tool for developing your student's knowledge construction functions. Once you have acquired this experience, you may wish to use the Complex Figure exercise with your class as a whole. Section A describes how to do this exercise with an individual student. Section B describes the adaptations that are needed to do the exercise with a group of students. An appendix provides a record of drawings that illustrate the use of this tool with a 13 year old student with a history of developmental delays. There is a great deal of variation among Complex Figure records. Striking records are common not only among students with special learning needs but also among students in general education classes.
Section A: Using the Exercise with One Student
To do this exercise, you need 6 pieces of plain white paper (5 for the student and 1 for yourself) and 2 pencils with erasers. Print Figure 1 and cut along the edges of the rectangle to prepare a stimulus card. Also have a notepad available.
Seating
When you work with one student, try to sit across from the learner. Seated this way you have unobstructed visual access to the student's face and eyes. This enables you to get more comprehensive information about the way the learner collects, connects and communicates information. Seated this way, it is easier, for example, to see how the student plans (T-23) her drawing and compares it (T-9) with the model figure.
In one part of this exercise (Step 3, see below), you will need to describe spatial relationships to the learner, and this should be done from the learner's viewpoint. As the learner is sitting across from you, this necessitates that you mentally adopt the viewpoint opposite the one you yourself perceive: The student's left is your right; the student's top is your bottom. If you are not comfortable reversing the spatial referents - a little practice is often all it takes - then simply sit next to the student during this part of the exercise, so you and the student can relate to the figure from the same point of view.
Six Steps
In the full exercise, there are six steps. They pivot around Step 3: Mediation. Steps 1 and 2 are identified as pre-mediation, or baseline steps, and 4, 5 and 6 as post-mediation steps. The six steps are as follows:
Discontinuation
Each step gives you valuable information, but you and the student do not have to complete them all. This is not a test and there is no grade. Most often, it is feasible to complete all six steps, but sometimes it isn't. As you can see, there is a significant amount of repetition across the six steps and this fact, combined with the particular difficulties a learner may have, can produce a situation where going forward would be a mistake: The student's motivation is the determining factor. If it drops, and you are unable to revive it using special requests ('I would like to ask you a special favor: Could you do one more; is it possible?'), humor or supportive non-verbal communication, then simply bring the exercise to a close at the end of the current step.
If you sense early that doing all six steps will be too much for the learner, you can shorten the exercise either by omitting the reproduction from memory before or after mediation, or both.
Pre-Mediation Steps - Baseline
Step 1: First Copy
Position the Complex Figure so the rectangle is horizontal and the diamond is to the right. Give the learner a piece of plain white paper oriented horizontally and a pencil with an eraser, and say I would like for you to draw the figure that you see here. Just draw it as well as you can. I will watch to see how you do it.
If the learner rotates the image, place it back in the original position (Try to do it this way). If the learner once more rotates the image, leave it where the learner prefers it to be. Learners may rotate the image in an attempt to reduce its complexity via reliance on a familiar shape. For example, a learner may evoke a house, or a rocket, by rotating the figure so the apex of the triangle points upward. The attempt to rely on a familiar shape often reduces the cognitive investment the learner makes to analyze the drawing. The result can be that the copy of the figure is short of details and structural elements that might have been rendered correctly, if the learner had not relied on the familiar image.
From the standpoint of next steps, the principal significance of the rotation is that it may be a clue to one or more underlying knowledge construction function, such as R-7: Systematic Exploratory Behavior, or T-7: Mental Representation that may need to be developed. The fragility of these functions may be the reason the learner tries to rotate the figure: Rotating the figure may seem to ease the difficulty of the task by enabling the learner to rely on familiar images and avoid the need to engage fragile knowledge construction functions.
Occasionally students will ask if they can use a ruler or trace the figure by placing the paper over the Complex Figure. Turn these requests down with an explanation: That would make it easier. It would make it easier because we would have to think less. But, you know, I would really like to see how you copy the figure using just your own good head.
The principal organizing features of the Complex Figure are the large rectangle along with the two diagonal and two bisecting lines that traverse it and create the nexus in the center of the figure. Pay attention to how the learner begins the drawing. Does the learner start to copy immediately or does the learner first survey the components of the drawing to collect more precise information? If so, is there evidence that the survey yields a usable plan, or strategy, to reproduce the drawing? Does the learner start by drawing the outer edge, by reproducing a detail, or by drawing an element such as the main rectangle, that can help to organize the reproduction of the figure as a whole?
Do not interrupt with anything but brief supportive expressions, if any at all, and instead concentrate on observing the learner. It is easy when you work with a single student to sketch the way the learner proceeds and easy to note the order in which the components are drawn. You may wish to create such a record so you more precisely can compare the student's approach before mediation with the one that will be used following mediation. Begin to think about the knowledge construction functions that may benefit from being developed and coming under more volitional control.
If the learner struggles, offer an encouraging remark, such as This is not easy. You are working hard. That is good. Just draw it the best way you can. Let the student tell you when he or she is done. Some students will wait and expect to hear from you. Say: Take your time and tell me when you are done. Or simply: Are you done? Curtail frustration or repeated erasing that doesn't lead to improvement: You are working hard. And you have already done well. Don't worry that you cannot make it look exactly the way you want. No one can draw it exactly like it is on the card. When the student is done label this production C-1 (Copy 1).
Step 2: First Memory
Remove the stimulus card and the student's copy. Place a fresh piece of plain white paper in front of the student in the horizontal position, and say: Now, let me tell you what I would like for you to do. Listen to this: I would like for you to draw the figure one more time but this time from memory - You did it before while looking at the card. Now I would like for you to do it without looking at anything. OK? I will again watch to see how you do it. It is really a pleasure to see how well you work. Draw what you remember - just do it as well as you can.
During the reproduction phase, as in the copying phase, look at what you see with an eye to discerning the knowledge construction functions the student uses or doesn't use. Does the learner rely on a coherent mental representation (T-7) or does the learner evoke details from memory (T-8) in a disconnected manner? How much effort does the learner expend and what type of affect accompanies this effort? When the student is done label this production M-1 (Memory 1).
Step 3 - Mediation
Position the Complex Figure as in Step 1. Place one piece of plain white paper in front of the student and another in front of you.
In this step, the main objective is for you and the student to draw a copy of the Complex Figure together. By labeling the processes of knowledge construction, by modeling your own behavior, and by providing feedback, the purpose is to enable the learner to strengthen fragile knowledge construction functions. The goal is to enable the student to gain insight into any such knowledge construction functions and to learn how to use them deliberately and purposefully in both school and non-school situations.
Planning (T-23), Systematic Exploratory Behavior (R-7), Spatial Orientation (R-3), Sequencing (T-10), Comparative behavior (T-9), and Precision and Accuracy (R-9 and C-7) are among the functions that often are addressed via the Complex Figure drawing. You may focus on just one or a few functions. Mediators rarely focus on more than a handful. Avoid cluttering the learning experience and making it too long.
Example of Introductory Dialogue
The dialogue models a teacher and a 4th grade student. It covers the start of the joint reproduction of the Complex Figure. The emphasis in this example is upon T-23: Planning. This emphasis is useful when Step 1 reveals an unsystematic approach in which the elements of the drawing are copied and reproduced from memory in a disorganized manner.
Use this language example to gain a sense of the purpose and flow of the interaction between teacher and student. The specific language you will use will depend on the particular knowledge construction functions you determine to be in need of development when you do this exercise with a student. In any given instance, the dialogue between teacher and student may be more or less detailed depending upon the student's level of functioning and the goals of the interaction. So, once more, the example below is offered merely for purposes of illustration, and not as a script to be followed.
Teacher and student sit across from one another and look at the Complex Figure. Imagine you are the teacher. Use your pencil to point as you speak. You and the student will not actually draw, until you have talked through a plan to do so.
Teacher: OK. Are you ready?
Student: Yes.
Teacher: Great. Up to now I have been watching you. I must tell you - it was a real pleasure. Now you and I will draw the figure together. But before we do that, we will plan it. Do you know what planning is? Do you know what the word means?
Student: It is like not doing something now.
Teacher: You are right. It is about not doing something now. Instead of doing something now, we think about doing it first. Planning is when we think first and do later. Why would we want to think first?
Student: Because it is better.
Teacher: Yes, it is better. Why is it better to think before we do? What makes it better?
Student: It is better because we won't make mistakes.
Teacher: That is true. The purpose of planning is to cut down on mistakes. That is exactly right. OK. Let's see how we are going to plan to copy this drawing: Lets start here - down at the bottom left of the drawing. What we will do is first draw this line. This line is the left vertical side of a rectangle. Do you know the word rectangle?
Student: Points to the bottom left corner of the main rectangle - traces the left vertical side of the main rectangle
Student: Is it a shape or something?
Teacher: Yes it is. A rectangle is a shape with four sides. Two by two the sides are equal. Two sides are longer than the other two. The two shorter sides face each other and the two longer sides face each other. The side we are going to draw first, this one here, is one of the two shorter sides of the rectangle. Now, can you find the other short side of the rectangle that faces it?
Student: Points
Student: This one.
Student: Points to the right vertical side of the rectangle
Teacher: Yes. And show me the whole line.
Student: Traces the right vertical side of the rectangle
If the student has difficulty, you can use a separate piece of paper to draw a rectangle and discuss its properties more carefully. Discuss number of lines, length of lines, number of angles, type of angle and the concept of parallel lines. Include a second rectangle to highlight the point that size is not a factor in what makes a rectangle a rectangle. Draw another rectangle, this one rotated to a vertical orientation, to make the same point about spatial position. When you are done, come back to the Complex Figure and continue where you left off.
Teacher: Great. We also say that sides or lines that face each other are parallel to each other. They run side by side. OK. We have two sides of the rectangle. In a rectangle the lines are connected in right angles. Like this [point to a right angle]. These angles are also called 90-degree angles. Here we have a right angle and here too, and here. Show me another angle in the drawing that is a right angle or a 90-degree angle.
Student: This one. And that one!
Teacher: Great. And show me an angle that is not a 90-degree angle.
Student: Here is one.
Student: Points to an acute angle
Teacher: Ok. That's good. - You pointed to an acute angle. It has less than 90 degrees. Here is an obtuse angle. It has more than 90 degrees [point to an obtuse angle] - Good. Let's get back to the rectangle. Can you show me the other two sides of the rectangle? The two long sides. The two sides we have are vertical. They go up and down. The two we are looking for are horizontal. They lie down.
Student: Here they are!
Teacher: Great. Now, trace the whole rectangle. Start with the bottom left corner and the left vertical side.
Student: Traces the large rectangle
Teacher: That is great. You know, this is a very complicated figure. It has a lot of lines and that can make it confusing. When there are many pieces to a problem, it is a good idea to see if some of them can be connected in a way that will help us to look at all the rest. So far, what is our plan to copy the drawing?
Student: We will draw the rectangle first.
Teacher: Yes, that is our plan. Let's think of some other situations where planning is useful.
Student: You can plan how to cross the road. Like, first you look to the left and then you look to the right.
Teacher: Yes, it is important to think before we walk across the road. You are right. When we think before we cross the road, it is like we make a plan. We make sure that what we do will work. What is another example? Can you make a plan for the way you spend your time?
Student: I could make a schedule - like my schedule for school. My school schedule is really like a plan for how I go through my day!
Teacher: OK. You are getting it. Let's see how we might plan to copy the rest of the drawing.
The teacher and the student continue the process. The teacher brings in also T-9: Comparative Behavior. In the mediation phase teacher and student first talk through the drawing. This enables you to reach out to a number of knowledge construction functions as illustrated in the dialogue in the example above. Afterwards, you and the student together execute the plan you came up with.
Teacher: OK. We have put our plan together. Let's now carry it out. I want for you to follow me. See where I place my pencil on the paper. Now put yours in the same place on your paper. Let's stay close together as we go through the plan.
Now draw according to the plan. Provide guiding vocal commentary to help the student connect action with the mental script represented by the plan ("Now we have to draw the right vertical line. OK. I see you got that too. Great. Next, we need to draw the bottom horizontal line to complete the rectangle.")
Establish a comfortable pace to keep the process moving. Observe the student's behavior. As students gain confidence, they may get out a little ahead of you. That is just fine. You may see them fall in behind you again when they are a little less certain about how to proceed. If the student gets too far ahead, synchronize the paces ("Don't get too far ahead of me. Let's do this together" or "Hey, I think I am going a little slow. Wait a bit and I will catch up to you so we can do this together.")
Model your own behavior during the drawing part of the mediation phase. Just draw and talk naturally about what you do. You do not need to focus on minor deviations from the plan that you and the student put together. The point is to learn about how thinking can guide behavior and how such knowledge construction functions as planning and precision are used. Be meticulous. But don't overdo it.
When you are done, label the student's drawing MLE (Mediated Learning Experience) and put both the student's and your figure drawing out of sight.
Post-Mediation Steps
Step 4: Second Copy
The post-mediation steps enable you to assess the benefits of the mediation you provided for the development of the students knowledge construction functions. Place the card with the Complex Figure in front of the student along with a piece of plain white paper. We have done one together. Now I would very much like to see again how you do one on your own.
As the student copies the figure, pay attention once more to the way the student does it. Look out for evidence that the knowledge construction functions you and the student focused on in the mediation phase are being used by the student. As before (Step 1), let the student bring the task to an end. Prompt if needed (Let me know when you are done). Label this production C-2 (Copy 2) and place it and the model figure out of sight.
Step 5: Second Memory
Place a piece of plain white paper in front of the student. Now I have a very special favor to ask. I would like for you to do one more and this one from memory. Depending on the student's reaction you may expand some: I know you have already worked hard. But if you can, it would be really great if you could do just one more. Let me know if you can. Most students are ready to do also this step as most get caught up in the task and, by now, are as curious about their ability to do this, as you may be. However, in the event that a student is not prepared to proceed, simply skip this step and say: You have worked hard and you have done well. Let's talk about what we did and what you have learned.
As the student reproduces the figure from memory, continue to pay attention to the way it is drawn. Look at the efficiency with which knowledge construction functions are used. Also look at how motivation is allocated and managed. Label this production M-2 (Memory 2).
Step 6: Summary
The purpose of this step is to take a look at changes that occurred across the steps of the exercise by contrasting the student's drawings before and after mediation. Compare Copy 1 with Copy 2 and compare Memory 1 with Memory 2. Use the comparison to once more talk about the knowledge construction functions that were targeted in the mediation phase and together look for a few more examples of where these knowledge construction functions can make a difference both in school work and in general. An illustration is provided below.
C-1 and C-4 are in front of the student.
Teacher: All right. You finished another one from memory. Hard work. I appreciate it. Now let's take a look at everything you have done. We will compare the first one you did while looking at the model figure with the second one you did while looking at the figure. Let's compare the two. What would you say?
Student: The second one is more like the model.
Teacher: Yes it is. What do you think was the difference? You did them both.
Student: In the second one I planned it and I compared what I did with the model.
Teacher: Yes, I think that is what you did. Planning and comparing were useful for you. Let's think of some other situations where planning and comparing can help us. Before we talked about planning to cross the street and we also talked about how a schedule is a plan. Let's think of a few more examples.
Student: How about planning a trip? You have to think about how much time you have and where you want to go and what you need to bring. Those are all important.
Teacher: Yes, you are right. Trips usually turn out better if they are planned. Can you think of an example from your schoolwork?
Student: Well, I can think about how I can make a plan to use my time so that I can get everything done.
Teacher: That's good. And, you know, once you start planning, you may find that you have time also to do a lot of other things because you have a better sense of the time each one will take. Planning can help us become more efficient but also to find time to relax and just enjoy casual things. - How about comparing. You mentioned that as well. I noticed that you used comparing when you made the second copy. I think it helped you to bring a lot more details into the drawing and to draw them in their correct locations.
Student: It did. If I looked at the model and compared it with mine it was easy to see what I had put in and what I still needed to do or to fix.
Teacher: What are some other situations where comparing makes a difference?
Student: Let me think. - It enables you to make better decisions about what to buy when you go shopping.
Teacher: Give me an example.
Student: Like going out to buy a bike. I have to look at the different models, what's on the bike, the color and the price. I need to compare to decide.
Teacher: Give me an example from your schoolwork.
Student: We need to compare to find out how the characters in a story are alike and different.
Teacher: Great
When you are done make sure there is a name and a date on each piece of paper. - If you work with the student on an on-going basis, you may wish to ask the student to draw the Complex Figure from memory at a later point in time. This is called Free Recall Delayed (FRD). It will allow you to look at aspects of long-term memory and changes in efficiency that may occur over time. You may find that the use of the knowledge construction functions has become more of a habit and that what initially was laborious now is performed with greater fluency and skill. This will be especially true if the classroom-learning environment has provided opportunities during the intervening time for the knowledge construction functions to be strengthened via further mediation and use in real and meaningful situations.
Section B: Using the Exercise with a Group of Students
You can easily adapt this exercise for use with a group of students: Make a transparency of the Complex Figure. Put it on an overhead projector so everyone can see it. It is easier in a large group to use just the overhead and not distribute individual cards with the Complex Figure. Keep in mind, however, that any such change alters the processing requirements and options that are available to the students. For example, relying on an overhead places more emphasis on visual transport, and students are no longer able to rotate the Complex Figure in space.
All six steps can be implemented. After you introduce the task, circulate among the students during Steps 1 and 2. Your observations are less detailed when you work with a larger number of students, but use your observations to identify a small number of functions (most often three or less) that you will focus on during the mediation phase (Step 3), which you can conduct as a whole group activity.
Following the mediation phase, circulate once again among the students to see how they now copy the figure (Step 4) and reproduce it from memory (Step 5). Use step 6 just as before to look at the change between the two copies and the two productions from memory. Once again, focus on the knowledge construction functions you emphasized in the course of the mediation. Have your students look for and discuss examples of how the development of these functions can be of significance not only on tasks like the Complex Figure, but also for many other tasks and situations.
You can use the group version of the exercise to identify students who may need more individualized attention. These are students whose performance before the mediation phase shows little improvement after the mediation phase. For these students the less precise mediation of the group format may be inadequate. You may wish to try the individual format with them. Remember, also, that the full MindLadder dynamic assessment program is available to assist in your work with all learners who do not respond to your instruction in the classroom. Go to Special Reports in the LearningGuide Advisor and click Download Special Report #1 to read more about the use of dynamic assessment with such students.
Appendix
The appendix presents the Complex Figure record of J. K., a 13 years, 8 months old boy with a long history of learning problems secondary to developmental delays. Steps 1, 2, 4 and 5 are all included and all drawings are reproduced in the original size. The time lapse from Step 1 to Step 5 was about 30 minutes. Among the functions included in the mediation were Spatial Orientation (R-3), Systematic Exploratory Behavior (R-7), Mental Representations (T-7), Evoking from Memory (T-8), and Planning (T-23). Note: the dialogue modeled in this resource was not recorded from the dynamic assessment of the learner whose Complex Figure record is illustrated here.
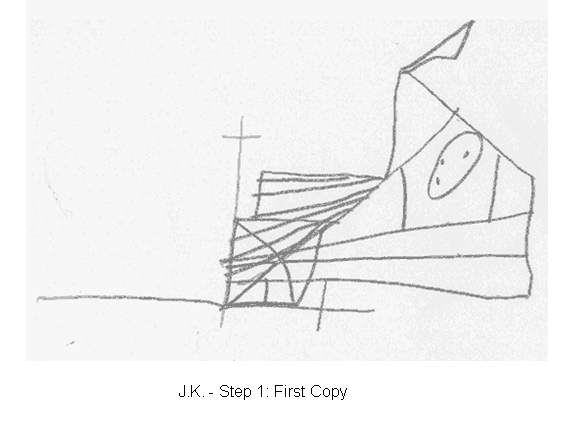
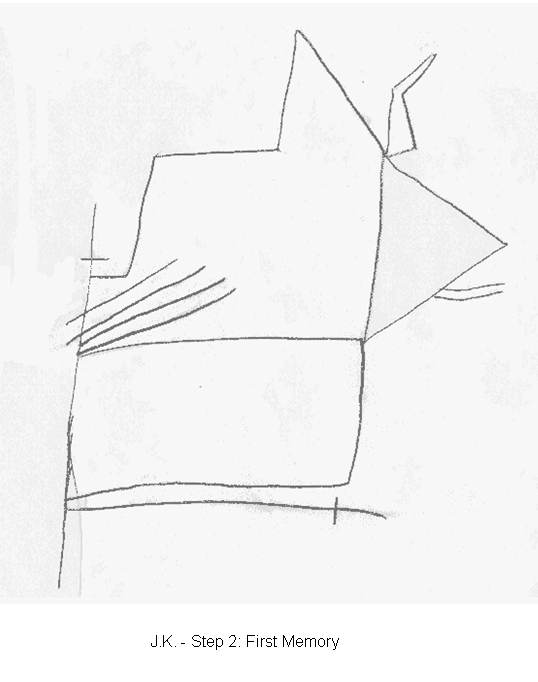
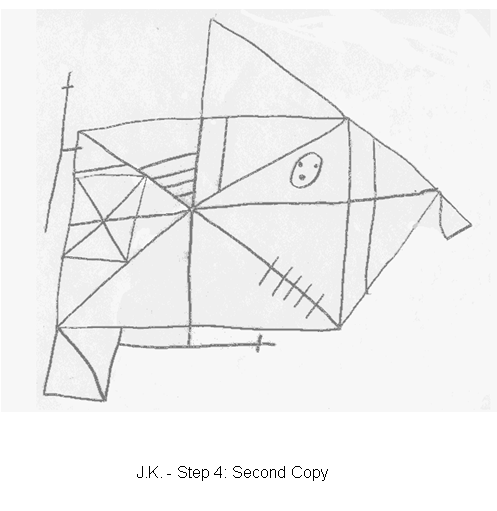

Exercises I and II
Background: Subject Areas and Content-Free Materials
Teachers use learning events from their individual academic subjects to mediate the development of the knowledge construction functions students need to process information and solve problems in that area. Through their instruction, teachers must connect the functions with the verbal tools, concepts, syntax, grammar, and facts that make up their discipline, and they must orchestrate opportunities for students to fuse its process and content dimensions through experience with real and meaningful problems within the discipline. This combination enables teachers to attend both to the content dimension of subject area knowledge and to the process dimension of the knowledge construction functions. The combination enables learners to go through the transition from the shallow and tentative performance of the novice to the proficient and confident performance of the skilled and knowledgeable student.
The need to develop and connect knowledge construction functions within each academic discipline is aided by the fact that the same knowledge construction functions recur across the disciplines. We use systematic exploratory behavior (R-7) in biology, chemistry, social studies, language arts and math and we search for relationships (T-14) and establish rules (T-25) across all of them.
The re-occurrence of the knowledge construction functions across all the subject areas means that all educators can accomplish some parts of the development of knowledge construction functions using generic materials that, relative to the academic disciplines, can be described as 'de-contextualized' or 'content-free'. With mediation, such materials can be used to launch (or boost) the development of students' knowledge construction functions and prepare them for integration and use within each content area as described above.
The purpose of this exercise is to show how you can use so-called content-free materials to accomplish this goal. The MindLadder dynamic assessment program provides a number of such tools that educators can use to develop knowledge construction functions for students with both regular and special learning needs. With one exception, all of the tools were developed at the International Center for Cognition and Learning specifically for dynamic assessment purposes. The exception is the Complex Figure which was developed in 1945 by Rey and Osterrieth for unrelated purposes. The Rey-Osterrieth Complex Figure, nonetheless, provides an excellent task to learn about and develop knowledge construction functions, and it is, as noted, available in the MindLadder dynamic assessment kit. The Complex Figure is reproduced in Figure 1. You can print and make overheads of the stimulus card as needed for the exercises described in this resource.
Classroom teachers can learn to use the MindLadder dynamic assessment tools initially with individual children and, subsequently, with small groups or even whole classrooms of students. The special design of these materials enables teachers and students to develop knowledge construction functions to ready them for integration and use within the academic subject areas. Once there, as indicated above, the functions need to be connected with the content dimension through instruction and teacher-mediated opportunities to apply them within real and meaningful situations.
There are two advantages to the use of content-free materials that should be mentioned here. First, the removal of the normal, academic content dimension enables materials to be designed that provide trained educators with tools to more precisely investigate the knowledge construction functions and mediate their development. Second, the removal of familiar content can produce a motivational advantage, especially for students who are struggling in the academic content areas. For these students, poor motivation often accompanies familiar academic tasks that have become associated with failure. The benefit of unfamiliar, decontextualized tasks is that educators often more easily can mediate the development of the knowledge construction functions that may have played a role in producing the failure in the academic areas to begin with. Once the functions have been developed in the decontextualized format, they can be connected and proceduralized within the subject area, where they need to operate to become meaningful.
Two Exercises
The two exercises included in this resource both use the Rey-Osterrieth Complex Figure. The first is designed for you to use your own cognition to learn about the knowledge construction functions. The second is designed for you to use the Complex Figure to work with individual students or, when you have acquired experience, groups of students. In this second exercise you will first observe knowledge construction
Figure 1: Ray-Osterrieth Complex Figure
functions ('pre-mediation'), then facilitate the development of key functions ('mediation'), and then observe the results of such mediation ('post-mediation'). Finally, you and your student(s) will examine the changes from the pre-mediation to the post-mediation phase and discuss the benefits of the mediation that was provided. The two exercises are described below.
Complex Figure - Exercise I
In this exercise you will use your own cognition and information processing to learn about the knowledge construction functions. To do this exercise, you need two pieces of plain white paper, a pencil and an eraser. You may wish to print and place a copy of the stimulus card in front of you. There are two parts to the exercise.
- Spatial Orientation (R-3)
- Systematic Exploratory Behavior (R-7)
- Sequencing (T-10)
- Comparative Behavior (T-9)
- Planning (T-23)
- Precision and Accuracy (R-9 and C-7)
Part II: Reproduction from Memory
Place the model of the Complex Figure out of sight along with your copy of the figure. Using the second piece of white blank paper, try to reproduce the figure from memory. See if you can experience a role for each of the following knowledge construction functions:
- Mental Representation (T-7)
- Evoking from Memory (T-8)
- Hypothetical Thinking (T-11)
- Need to Search for and Establish Relationships (T-14)
- Projection of Virtual Relationships (C-3)
When you have drawn what you remember, summarize the functions you used in your own words. Now compare your copy and your reproduction from memory with the model figure, and with one another. Look at how you approached the tasks. How did you start in each case? Did you follow the edge of the figure? Did you start with a detail, or did you look for a central organizing element such as the large rectangle? Which way is likely to provide the most support for copying and reproducing the figure? Did you notice any changes in the way you went about the task when you drew the figure from memory compared to when you copied it? What might account for any differences you see? What did you learn, overall, about the knowledge construction functions from copying and reproducing the Complex Figure?
To complete this exercise, think about the students in your school or classroom and how they can benefit from developing the knowledge construction functions, you have learned about here. Try to find examples from the academic subject areas and curricular goals where these knowledge construction functions play a role. Use the resources of the LearningGuide Advisor to learn more about each of these functions and their development. Click Identifying Functions: Academic Standards for examples of how knowledge construction functions connect to academic standards. Click Developing Functions: Classroom Dialogues for information about the kind of interaction you can use to introduce a new knowledge construction function in the classroom. Click Developing Functions: General Strategies for information about how to develop each function.
Now that you have become familiar with the Complex Figure, you can use the second exercise to learn how you can employ it to launch or boost the development of your students' knowledge construction functions.
Complex Figure - Exercise II
In this exercise, you will use the Complex Figure to work interactively or 'dynamically' with a student in order to identify and mediate knowledge construction functions in need of development. If you work individually with a number of students, you will get a sense of the range of your students' process learning needs. You will also develop an understanding of the versatility of the Complex Figure as a tool for developing your student's knowledge construction functions. Once you have acquired this experience, you may wish to use the Complex Figure exercise with your class as a whole. Section A describes how to do this exercise with an individual student. Section B describes the adaptations that are needed to do the exercise with a group of students. An appendix provides a record of drawings that illustrate the use of this tool with a 13 year old student with a history of developmental delays. There is a great deal of variation among Complex Figure records. Striking records are common not only among students with special learning needs but also among students in general education classes.
Section A: Using the Exercise with One Student
To do this exercise, you need 6 pieces of plain white paper (5 for the student and 1 for yourself) and 2 pencils with erasers. Print Figure 1 and cut along the edges of the rectangle to prepare a stimulus card. Also have a notepad available.
Seating
When you work with one student, try to sit across from the learner. Seated this way you have unobstructed visual access to the student's face and eyes. This enables you to get more comprehensive information about the way the learner collects, connects and communicates information. Seated this way, it is easier, for example, to see how the student plans (T-23) her drawing and compares it (T-9) with the model figure.
In one part of this exercise (Step 3, see below), you will need to describe spatial relationships to the learner, and this should be done from the learner's viewpoint. As the learner is sitting across from you, this necessitates that you mentally adopt the viewpoint opposite the one you yourself perceive: The student's left is your right; the student's top is your bottom. If you are not comfortable reversing the spatial referents - a little practice is often all it takes - then simply sit next to the student during this part of the exercise, so you and the student can relate to the figure from the same point of view.
Six Steps
In the full exercise, there are six steps. They pivot around Step 3: Mediation. Steps 1 and 2 are identified as pre-mediation, or baseline steps, and 4, 5 and 6 as post-mediation steps. The six steps are as follows:
- First Copy: The student copies the Complex Figure. You observe.
- First Memory: The student reproduces the Complex Figure from memory. You observe.
- Mediation: You and the student produce a copy of the Complex Figure together.
- Second Copy: The student copies the Complex Figure. You observe.
- Second Memory: The student reproduces the Complex Figure from memory. You observe.
- Summary: Comparison and discussion of Copy 1/Copy 2 and Memory 1/Memory 2.
Discontinuation
Each step gives you valuable information, but you and the student do not have to complete them all. This is not a test and there is no grade. Most often, it is feasible to complete all six steps, but sometimes it isn't. As you can see, there is a significant amount of repetition across the six steps and this fact, combined with the particular difficulties a learner may have, can produce a situation where going forward would be a mistake: The student's motivation is the determining factor. If it drops, and you are unable to revive it using special requests ('I would like to ask you a special favor: Could you do one more; is it possible?'), humor or supportive non-verbal communication, then simply bring the exercise to a close at the end of the current step.
If you sense early that doing all six steps will be too much for the learner, you can shorten the exercise either by omitting the reproduction from memory before or after mediation, or both.
Pre-Mediation Steps - Baseline
Step 1: First Copy
Position the Complex Figure so the rectangle is horizontal and the diamond is to the right. Give the learner a piece of plain white paper oriented horizontally and a pencil with an eraser, and say I would like for you to draw the figure that you see here. Just draw it as well as you can. I will watch to see how you do it.
If the learner rotates the image, place it back in the original position (Try to do it this way). If the learner once more rotates the image, leave it where the learner prefers it to be. Learners may rotate the image in an attempt to reduce its complexity via reliance on a familiar shape. For example, a learner may evoke a house, or a rocket, by rotating the figure so the apex of the triangle points upward. The attempt to rely on a familiar shape often reduces the cognitive investment the learner makes to analyze the drawing. The result can be that the copy of the figure is short of details and structural elements that might have been rendered correctly, if the learner had not relied on the familiar image.
From the standpoint of next steps, the principal significance of the rotation is that it may be a clue to one or more underlying knowledge construction function, such as R-7: Systematic Exploratory Behavior, or T-7: Mental Representation that may need to be developed. The fragility of these functions may be the reason the learner tries to rotate the figure: Rotating the figure may seem to ease the difficulty of the task by enabling the learner to rely on familiar images and avoid the need to engage fragile knowledge construction functions.
Occasionally students will ask if they can use a ruler or trace the figure by placing the paper over the Complex Figure. Turn these requests down with an explanation: That would make it easier. It would make it easier because we would have to think less. But, you know, I would really like to see how you copy the figure using just your own good head.
The principal organizing features of the Complex Figure are the large rectangle along with the two diagonal and two bisecting lines that traverse it and create the nexus in the center of the figure. Pay attention to how the learner begins the drawing. Does the learner start to copy immediately or does the learner first survey the components of the drawing to collect more precise information? If so, is there evidence that the survey yields a usable plan, or strategy, to reproduce the drawing? Does the learner start by drawing the outer edge, by reproducing a detail, or by drawing an element such as the main rectangle, that can help to organize the reproduction of the figure as a whole?
Do not interrupt with anything but brief supportive expressions, if any at all, and instead concentrate on observing the learner. It is easy when you work with a single student to sketch the way the learner proceeds and easy to note the order in which the components are drawn. You may wish to create such a record so you more precisely can compare the student's approach before mediation with the one that will be used following mediation. Begin to think about the knowledge construction functions that may benefit from being developed and coming under more volitional control.
If the learner struggles, offer an encouraging remark, such as This is not easy. You are working hard. That is good. Just draw it the best way you can. Let the student tell you when he or she is done. Some students will wait and expect to hear from you. Say: Take your time and tell me when you are done. Or simply: Are you done? Curtail frustration or repeated erasing that doesn't lead to improvement: You are working hard. And you have already done well. Don't worry that you cannot make it look exactly the way you want. No one can draw it exactly like it is on the card. When the student is done label this production C-1 (Copy 1).
Step 2: First Memory
Remove the stimulus card and the student's copy. Place a fresh piece of plain white paper in front of the student in the horizontal position, and say: Now, let me tell you what I would like for you to do. Listen to this: I would like for you to draw the figure one more time but this time from memory - You did it before while looking at the card. Now I would like for you to do it without looking at anything. OK? I will again watch to see how you do it. It is really a pleasure to see how well you work. Draw what you remember - just do it as well as you can.
During the reproduction phase, as in the copying phase, look at what you see with an eye to discerning the knowledge construction functions the student uses or doesn't use. Does the learner rely on a coherent mental representation (T-7) or does the learner evoke details from memory (T-8) in a disconnected manner? How much effort does the learner expend and what type of affect accompanies this effort? When the student is done label this production M-1 (Memory 1).
Step 3 - Mediation
Position the Complex Figure as in Step 1. Place one piece of plain white paper in front of the student and another in front of you.
In this step, the main objective is for you and the student to draw a copy of the Complex Figure together. By labeling the processes of knowledge construction, by modeling your own behavior, and by providing feedback, the purpose is to enable the learner to strengthen fragile knowledge construction functions. The goal is to enable the student to gain insight into any such knowledge construction functions and to learn how to use them deliberately and purposefully in both school and non-school situations.
Planning (T-23), Systematic Exploratory Behavior (R-7), Spatial Orientation (R-3), Sequencing (T-10), Comparative behavior (T-9), and Precision and Accuracy (R-9 and C-7) are among the functions that often are addressed via the Complex Figure drawing. You may focus on just one or a few functions. Mediators rarely focus on more than a handful. Avoid cluttering the learning experience and making it too long.
Example of Introductory Dialogue
The dialogue models a teacher and a 4th grade student. It covers the start of the joint reproduction of the Complex Figure. The emphasis in this example is upon T-23: Planning. This emphasis is useful when Step 1 reveals an unsystematic approach in which the elements of the drawing are copied and reproduced from memory in a disorganized manner.
Use this language example to gain a sense of the purpose and flow of the interaction between teacher and student. The specific language you will use will depend on the particular knowledge construction functions you determine to be in need of development when you do this exercise with a student. In any given instance, the dialogue between teacher and student may be more or less detailed depending upon the student's level of functioning and the goals of the interaction. So, once more, the example below is offered merely for purposes of illustration, and not as a script to be followed.
Teacher and student sit across from one another and look at the Complex Figure. Imagine you are the teacher. Use your pencil to point as you speak. You and the student will not actually draw, until you have talked through a plan to do so.
Teacher: OK. Are you ready?
Student: Yes.
Teacher: Great. Up to now I have been watching you. I must tell you - it was a real pleasure. Now you and I will draw the figure together. But before we do that, we will plan it. Do you know what planning is? Do you know what the word means?
Student: It is like not doing something now.
Teacher: You are right. It is about not doing something now. Instead of doing something now, we think about doing it first. Planning is when we think first and do later. Why would we want to think first?
Student: Because it is better.
Teacher: Yes, it is better. Why is it better to think before we do? What makes it better?
Student: It is better because we won't make mistakes.
Teacher: That is true. The purpose of planning is to cut down on mistakes. That is exactly right. OK. Let's see how we are going to plan to copy this drawing: Lets start here - down at the bottom left of the drawing. What we will do is first draw this line. This line is the left vertical side of a rectangle. Do you know the word rectangle?
Student: Points to the bottom left corner of the main rectangle - traces the left vertical side of the main rectangle
Student: Is it a shape or something?
Teacher: Yes it is. A rectangle is a shape with four sides. Two by two the sides are equal. Two sides are longer than the other two. The two shorter sides face each other and the two longer sides face each other. The side we are going to draw first, this one here, is one of the two shorter sides of the rectangle. Now, can you find the other short side of the rectangle that faces it?
Student: Points
Student: This one.
Student: Points to the right vertical side of the rectangle
Teacher: Yes. And show me the whole line.
Student: Traces the right vertical side of the rectangle
If the student has difficulty, you can use a separate piece of paper to draw a rectangle and discuss its properties more carefully. Discuss number of lines, length of lines, number of angles, type of angle and the concept of parallel lines. Include a second rectangle to highlight the point that size is not a factor in what makes a rectangle a rectangle. Draw another rectangle, this one rotated to a vertical orientation, to make the same point about spatial position. When you are done, come back to the Complex Figure and continue where you left off.
Teacher: Great. We also say that sides or lines that face each other are parallel to each other. They run side by side. OK. We have two sides of the rectangle. In a rectangle the lines are connected in right angles. Like this [point to a right angle]. These angles are also called 90-degree angles. Here we have a right angle and here too, and here. Show me another angle in the drawing that is a right angle or a 90-degree angle.
Student: This one. And that one!
Teacher: Great. And show me an angle that is not a 90-degree angle.
Student: Here is one.
Student: Points to an acute angle
Teacher: Ok. That's good. - You pointed to an acute angle. It has less than 90 degrees. Here is an obtuse angle. It has more than 90 degrees [point to an obtuse angle] - Good. Let's get back to the rectangle. Can you show me the other two sides of the rectangle? The two long sides. The two sides we have are vertical. They go up and down. The two we are looking for are horizontal. They lie down.
Student: Here they are!
Teacher: Great. Now, trace the whole rectangle. Start with the bottom left corner and the left vertical side.
Student: Traces the large rectangle
Teacher: That is great. You know, this is a very complicated figure. It has a lot of lines and that can make it confusing. When there are many pieces to a problem, it is a good idea to see if some of them can be connected in a way that will help us to look at all the rest. So far, what is our plan to copy the drawing?
Student: We will draw the rectangle first.
Teacher: Yes, that is our plan. Let's think of some other situations where planning is useful.
Student: You can plan how to cross the road. Like, first you look to the left and then you look to the right.
Teacher: Yes, it is important to think before we walk across the road. You are right. When we think before we cross the road, it is like we make a plan. We make sure that what we do will work. What is another example? Can you make a plan for the way you spend your time?
Student: I could make a schedule - like my schedule for school. My school schedule is really like a plan for how I go through my day!
Teacher: OK. You are getting it. Let's see how we might plan to copy the rest of the drawing.
The teacher and the student continue the process. The teacher brings in also T-9: Comparative Behavior. In the mediation phase teacher and student first talk through the drawing. This enables you to reach out to a number of knowledge construction functions as illustrated in the dialogue in the example above. Afterwards, you and the student together execute the plan you came up with.
Teacher: OK. We have put our plan together. Let's now carry it out. I want for you to follow me. See where I place my pencil on the paper. Now put yours in the same place on your paper. Let's stay close together as we go through the plan.
Now draw according to the plan. Provide guiding vocal commentary to help the student connect action with the mental script represented by the plan ("Now we have to draw the right vertical line. OK. I see you got that too. Great. Next, we need to draw the bottom horizontal line to complete the rectangle.")
Establish a comfortable pace to keep the process moving. Observe the student's behavior. As students gain confidence, they may get out a little ahead of you. That is just fine. You may see them fall in behind you again when they are a little less certain about how to proceed. If the student gets too far ahead, synchronize the paces ("Don't get too far ahead of me. Let's do this together" or "Hey, I think I am going a little slow. Wait a bit and I will catch up to you so we can do this together.")
Model your own behavior during the drawing part of the mediation phase. Just draw and talk naturally about what you do. You do not need to focus on minor deviations from the plan that you and the student put together. The point is to learn about how thinking can guide behavior and how such knowledge construction functions as planning and precision are used. Be meticulous. But don't overdo it.
When you are done, label the student's drawing MLE (Mediated Learning Experience) and put both the student's and your figure drawing out of sight.
Post-Mediation Steps
Step 4: Second Copy
The post-mediation steps enable you to assess the benefits of the mediation you provided for the development of the students knowledge construction functions. Place the card with the Complex Figure in front of the student along with a piece of plain white paper. We have done one together. Now I would very much like to see again how you do one on your own.
As the student copies the figure, pay attention once more to the way the student does it. Look out for evidence that the knowledge construction functions you and the student focused on in the mediation phase are being used by the student. As before (Step 1), let the student bring the task to an end. Prompt if needed (Let me know when you are done). Label this production C-2 (Copy 2) and place it and the model figure out of sight.
Step 5: Second Memory
Place a piece of plain white paper in front of the student. Now I have a very special favor to ask. I would like for you to do one more and this one from memory. Depending on the student's reaction you may expand some: I know you have already worked hard. But if you can, it would be really great if you could do just one more. Let me know if you can. Most students are ready to do also this step as most get caught up in the task and, by now, are as curious about their ability to do this, as you may be. However, in the event that a student is not prepared to proceed, simply skip this step and say: You have worked hard and you have done well. Let's talk about what we did and what you have learned.
As the student reproduces the figure from memory, continue to pay attention to the way it is drawn. Look at the efficiency with which knowledge construction functions are used. Also look at how motivation is allocated and managed. Label this production M-2 (Memory 2).
Step 6: Summary
The purpose of this step is to take a look at changes that occurred across the steps of the exercise by contrasting the student's drawings before and after mediation. Compare Copy 1 with Copy 2 and compare Memory 1 with Memory 2. Use the comparison to once more talk about the knowledge construction functions that were targeted in the mediation phase and together look for a few more examples of where these knowledge construction functions can make a difference both in school work and in general. An illustration is provided below.
C-1 and C-4 are in front of the student.
Teacher: All right. You finished another one from memory. Hard work. I appreciate it. Now let's take a look at everything you have done. We will compare the first one you did while looking at the model figure with the second one you did while looking at the figure. Let's compare the two. What would you say?
Student: The second one is more like the model.
Teacher: Yes it is. What do you think was the difference? You did them both.
Student: In the second one I planned it and I compared what I did with the model.
Teacher: Yes, I think that is what you did. Planning and comparing were useful for you. Let's think of some other situations where planning and comparing can help us. Before we talked about planning to cross the street and we also talked about how a schedule is a plan. Let's think of a few more examples.
Student: How about planning a trip? You have to think about how much time you have and where you want to go and what you need to bring. Those are all important.
Teacher: Yes, you are right. Trips usually turn out better if they are planned. Can you think of an example from your schoolwork?
Student: Well, I can think about how I can make a plan to use my time so that I can get everything done.
Teacher: That's good. And, you know, once you start planning, you may find that you have time also to do a lot of other things because you have a better sense of the time each one will take. Planning can help us become more efficient but also to find time to relax and just enjoy casual things. - How about comparing. You mentioned that as well. I noticed that you used comparing when you made the second copy. I think it helped you to bring a lot more details into the drawing and to draw them in their correct locations.
Student: It did. If I looked at the model and compared it with mine it was easy to see what I had put in and what I still needed to do or to fix.
Teacher: What are some other situations where comparing makes a difference?
Student: Let me think. - It enables you to make better decisions about what to buy when you go shopping.
Teacher: Give me an example.
Student: Like going out to buy a bike. I have to look at the different models, what's on the bike, the color and the price. I need to compare to decide.
Teacher: Give me an example from your schoolwork.
Student: We need to compare to find out how the characters in a story are alike and different.
Teacher: Great
When you are done make sure there is a name and a date on each piece of paper. - If you work with the student on an on-going basis, you may wish to ask the student to draw the Complex Figure from memory at a later point in time. This is called Free Recall Delayed (FRD). It will allow you to look at aspects of long-term memory and changes in efficiency that may occur over time. You may find that the use of the knowledge construction functions has become more of a habit and that what initially was laborious now is performed with greater fluency and skill. This will be especially true if the classroom-learning environment has provided opportunities during the intervening time for the knowledge construction functions to be strengthened via further mediation and use in real and meaningful situations.
Section B: Using the Exercise with a Group of Students
You can easily adapt this exercise for use with a group of students: Make a transparency of the Complex Figure. Put it on an overhead projector so everyone can see it. It is easier in a large group to use just the overhead and not distribute individual cards with the Complex Figure. Keep in mind, however, that any such change alters the processing requirements and options that are available to the students. For example, relying on an overhead places more emphasis on visual transport, and students are no longer able to rotate the Complex Figure in space.
All six steps can be implemented. After you introduce the task, circulate among the students during Steps 1 and 2. Your observations are less detailed when you work with a larger number of students, but use your observations to identify a small number of functions (most often three or less) that you will focus on during the mediation phase (Step 3), which you can conduct as a whole group activity.
Following the mediation phase, circulate once again among the students to see how they now copy the figure (Step 4) and reproduce it from memory (Step 5). Use step 6 just as before to look at the change between the two copies and the two productions from memory. Once again, focus on the knowledge construction functions you emphasized in the course of the mediation. Have your students look for and discuss examples of how the development of these functions can be of significance not only on tasks like the Complex Figure, but also for many other tasks and situations.
You can use the group version of the exercise to identify students who may need more individualized attention. These are students whose performance before the mediation phase shows little improvement after the mediation phase. For these students the less precise mediation of the group format may be inadequate. You may wish to try the individual format with them. Remember, also, that the full MindLadder dynamic assessment program is available to assist in your work with all learners who do not respond to your instruction in the classroom. Go to Special Reports in the LearningGuide Advisor and click Download Special Report #1 to read more about the use of dynamic assessment with such students.
Appendix
The appendix presents the Complex Figure record of J. K., a 13 years, 8 months old boy with a long history of learning problems secondary to developmental delays. Steps 1, 2, 4 and 5 are all included and all drawings are reproduced in the original size. The time lapse from Step 1 to Step 5 was about 30 minutes. Among the functions included in the mediation were Spatial Orientation (R-3), Systematic Exploratory Behavior (R-7), Mental Representations (T-7), Evoking from Memory (T-8), and Planning (T-23). Note: the dialogue modeled in this resource was not recorded from the dynamic assessment of the learner whose Complex Figure record is illustrated here.